Thursday, June 23, 2016

Running .Net on a Mac

Since the delivery of .NET Core is close, I figured it was time to give it a try on my Mac.
1) Installed Visual Studio Code
2) Installed .Net Core
3) Create a project directory
Open Terminal and go to your working directory
‘mkdir HelloWorld'
‘cd HelloWorld’
4) Get yourself the default template; lucky for us dotnet gives us a simple option.
‘dotnet new’
This command will give you two files; “Program.cs” and “project.json” in the project directory.
5) Build the default project
‘dotnet build’
This will return two error messages shown below because we’re missing some basic dependencies.
"Project HelloWorld does not have a lock file.
Project HelloWorld does not have a lock file.”
6) Get your dependancies where are noted in project.js
‘dotnet restore’
If you’ve never attempted this before your system will head off to the Internet and download everything you need. If you’re done this at any stage before nuget should just get them from the cache.
7) Try your build again and it should succeed
‘dotnet build'
8) Run your simple default application
‘dotnet run'
9) Open the program in Visual Studio Code and make a simple change to the code on line 9 to return some specific text. Save the file and run again.
10) Run your updated application
‘dotnet run'
The framework identified that the code has changed and rebuilt the application.

Building and running with Visual Studio Code

Having to run on the commend line is a bit of a pain, so this is how you can do it within the Visual Studio Code IDE (VSC).
1) Click the debug icon in VSC and then then Play icon in the toolbar.
This will ask you to select the environment you want to run. I picked “VS Code Extension Development”, but really we’re just looking for it to create the launch.json file.
2) Click Close and then hit Play button again and “Configure Task Running” which gives you a list of different options to choose from. I picked “.Net Core"
3) At this point you should end up with a new "tasks.json” file within your project.
4) Open this and change the “taskName” from “build” to “run” and save.
5) Hit <shift><command>P; to bring up the explorer option in the toolbar
6) type ‘run’ and select “Tasks: Run Task” and within the output window you should see the results.
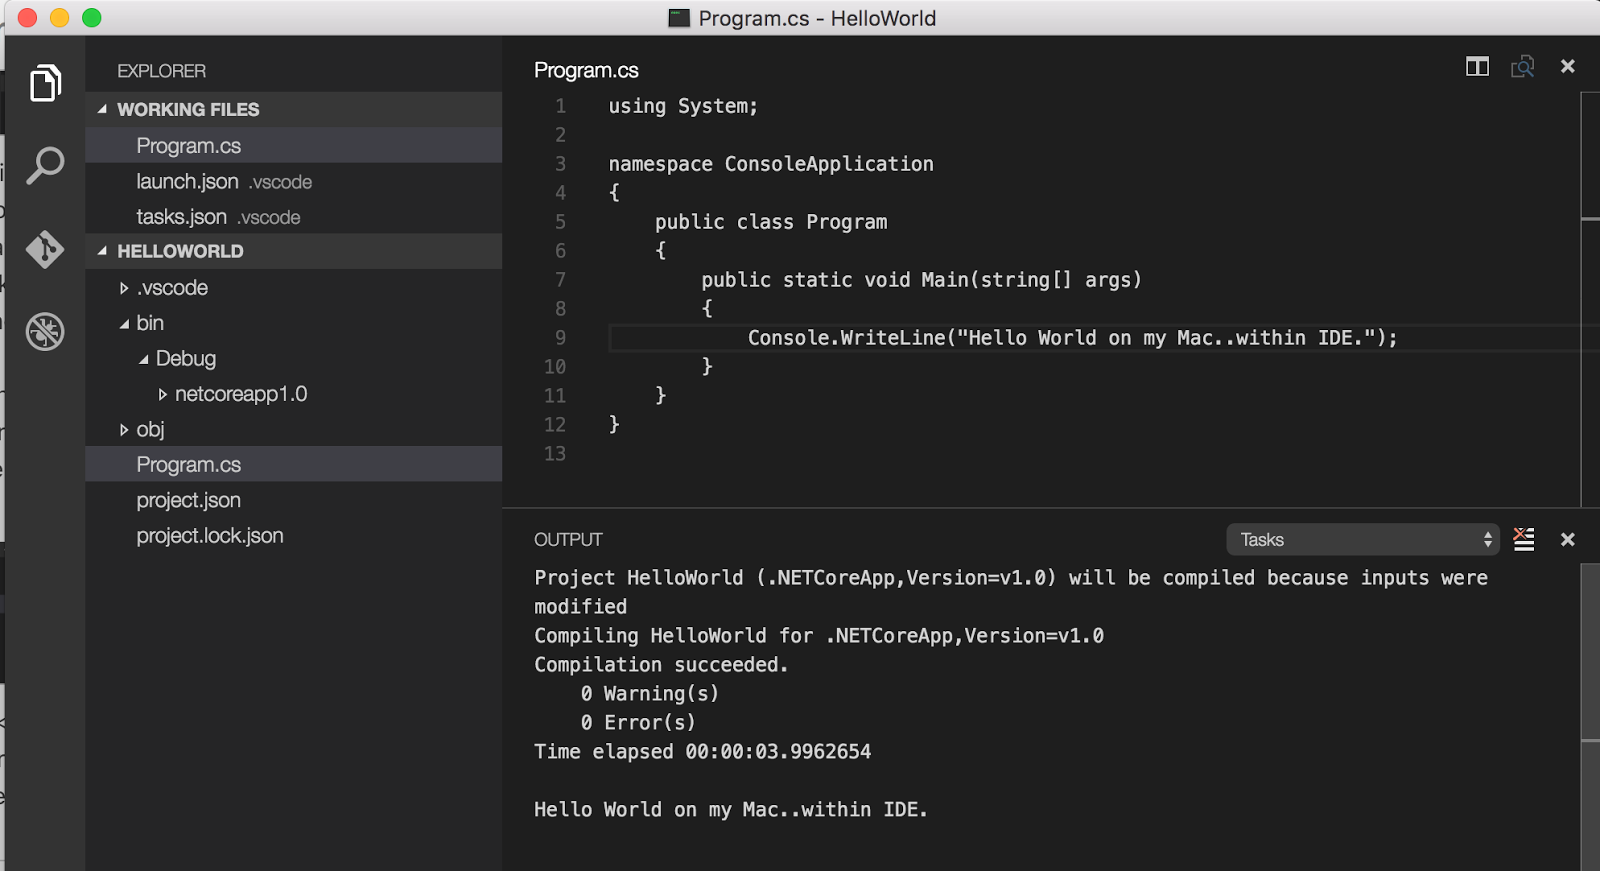
7) But seriously, who wants to type all that every time.. I prefer to stick to my old Visual Studio <shift><command>B. So we need to reassign that using Code/Preferences/Keyboard Short cuts from the menu.
8) This will create a new keybindings.json file where you can override existing or add new bindings. I added the following and saved the file:
[{
"key": "shift+cmd+b",
"command": "workbench.action.tasks.runTask",
"when": "editorTextFocus"
}
]
9) Now all I need to compile/run is hit the short cut keys.

Sunday, June 12, 2016

Install TP-Link TL-WN822N on Mac

Playing with a high-gain antenna today on my Mac and had issues getting it to be recognised by the operating system. I’m running OSx El Capitan (v 10.11.5) and just plugging in the devices although working on my Windows Laptop refused to be see on the Mac.
To get everything up and running I needed to do a bit of Googling which lead me to this port, which had very little real detail so here are the steps I took.

1) Download the driver from the TP Link site (http://www.tp-link.com/en/download/TL-WN822N.html#Driver or go directly to the download (http://www.tp-link.com/res/down/soft/TL-WN822N(EU)_V4_160315_Mac.zip). 

2) Once you download the file, you should find another file "Mac OS X 10.7_10.10.zip”. Open this file and you get an installer and Uninstall.command file.

3) Download Pacifist and follow the instructions for the installation. Watch out for any of the attpemts to get you to sign up for things that you really don’t want. Once the application starts open the installer.pkg file
4) Select the "RtWlanU1827.kext” file and click
“Install” from the upper left hand corner of the dialogue.
5) Drag the "TP-LINK Wireless Configuration Utility” application to your
desktop.
6) Double click the "TP-LINK Wireless Configuration Utility” application
and the antenna details should appear.


Entity Framework error ‘There is already an open DataReader associated with this Command which must be closed first.’

Had an error on a WebAPI call, which suddendly appeared, when attempting to get a list of Users from standard Identity Framework code.

There was the ususal massive (and almost completely useless) outer exception of "Error getting value from 'Claims' on 'System.Data.Entity.DynamicProxies.ApplicationUser_7215CB73076794A910D6058DEA10BE4541B79EFD3A2E64C8BB0403E9276DE20E'.” and within that "An error occurred while executing the command definition. See the inner exception for details”. Until finally we got to the base error "There is already an open DataReader associated with this Command which must be closed first.” of type System.InvalidOperationException.

After a few minutes scrating my head trying to figure out what was wrong, changing connection strings and trying to shut down all connections I came across a new option that can be added to the connection string, which was "MultipleActiveResultSets=True” (https://msdn.microsoft.com/en-ie/data/jj556606.aspx).

Changing the string from:
Server=(LocalDb)\MSSQLLocalDB;Database=<name>;Trusted_Connection=True
to
Server=(LocalDb)\MSSQLLocalDB;Database=<name>;Trusted_Connection=True;MultipleActiveResultSets=True;

Addressed the issue; I’m not 100% on the impact of this change, but it seems to fix the error and have no obvious down side.