Wednesday, February 25, 2009

Unrecognized attribute 'xmlns'.

If you ever the the error message “Unrecognized attribute 'xmlns'.” appear in the browser.

image

the reason is because the .NET framework is set to version 1.1 and not 2.0.  To fix this open IIS and right click the virtual directory, in this case CSSSearch and select Properties from the menu.

image

Click the ASP.NET tab and change the ASP.NET version to 2.0.

image

Click OK and that should be it.

Sunday, February 22, 2009

Linq extensions missing

I recently had a project to do using the new Microsoft Entity Framework, which gave me a serious bit of head scratching to do. The problem was that I had created a model as usual and created a controller class as usual; however compiling the code below gave me the error:

'System.Data.Objects.ObjectQuery' does not contain a definition for 'ToList' and no extension method 'ToList' accepting a first argument of type 'System.Data.Objects.ObjectQuery' could be found (are you missing a using directive or an assembly reference?)


public object GetSuppliers()
{
ObjectQuery supplierQuery;
using(NorthwindEntities northwindContext = new NorthwindEntities())
{
supplierQuery = northwindContext.Suppliers;
}
return supplierQuery.ToList();
}


WTF? Hang on I've used code like this dozens of times before and never got this error before. It took quite a time for me to figure out that when the class was created by Visual Studio it had failed to add the usual using System.Linq; line at the top.

This lead me to think, why this was the case and I found this interesting article which describes extension methods.

Simple once you know the answer.

Thursday, February 19, 2009

Adding the Firebug plug-in to FireFox

I love firebug, I’d go as far as saying the main reason you’d want to download the browser to use use this fantastic little bit of functionality.  This handy little tool allows for the debugging, editing, and monitoring of any website's CSS, HTML or JavaScript.  It’s also very handy for working with JQuery.

Adding Firebug to your browser

First you need a copy of Firefox which you can get from the web.  (Note: you should be on FireFox v3 or higher to use FireBug)

image

Once you’ve started Firefox go to Tools/Add-ins from the menu.

image

Click “Get Add-on” in the upper left hand corner and type “FireBug” into the search field below and hit Enter..

image

Firebug should be the first one returned.  Click the “add to Firefox” button

image

Click the Install Now button and close the Add-In window and restart FireFox.

image

Now you should be able to see the Firebug logo in the bottom right Hand corner, click this at any time to start the Add-in.

Using Fire Bug to view HTML and run Scripts.

On any webpage click the bug icon.

image

A window will appear below showing all the HTML on that page which can be easily navigated.

To run a script click on the Console tab.

image

Click on the Console box and hit the “Apply settings to <server name>”

image

You will need to expand the Console window by clicking the red arrow in the bottom left hand corner.

Enter your script into this box and click Run.

e.g.  Before

image

after hitting Run.

image

As you can see the word “Hello” has been added to the DIV named “theDiv”.  The left hand side of the screen returns the results or any errors encountered on that JQuery script.

Monday, February 16, 2009

SharePoint MOSS won’t let you do a ‘Complete’ installation

If after attempting to install SharePoint Moss you get the following issue where it will no allow you to choose a “Complete” installation.

image

This problem is not due to MOSS itself but to WSS version 3 which is a required pre-requisite.  When installing WSS the User probably chose the “basic” installation option.

Removing WSS version 3 and re-installing.

Unfortunately there is no simple way to change the installation once it has been created so you need to remove the old version and reinstall.

image

From the Control Panel chose Add/Remove Programs and choose “Microsoft Windows SharePoint Service 3.0” and click the Remove button. Click “Yes” to confirm you with to remove the program.

image

You will get a warning message regarding any existing data you may have in SharePoint, Click OK.

image

Eventually the uninstall will complete, click Yes and allow the server to reboot.

Run the installation for WSS version 3 again which can be downloaded directly from Microsoft.

image

You should see the progress bar.

image

Accept the Licence Agreement and click Continue, when the message dialogue appears.

image

Choose “Advanced”.

image

Choose “Web Front End” and click “Install Now”.

image

Unclick the “Run the SharePoint Products and Technology Configuration Wizard now” option and click “Close”.

Now when you run the MOSS installation you should see the following:image

Now you get the option to install MOSS as a “Complete”.

Friday, February 13, 2009

Ghost Doc

As we were talking about autocode documenting, you should try out GhostDoc which is a very simple and easy to use add-in for Visual Studio. 

Installation

Just download the ZIP file from the website

Run the installer MSI file.

image

Check Next

image

Agree and click Next.

image

Choose the default location or change it as required.  Click Next and Next Again

image

After a few seconds you should see the following to say Installation was successful.  click Close.

Using it within Visual Studio

Start visual Studio 2008 for the first time after installation you’ll see the following message.

image

Take the default option of <CTRL><SHIFT>D and click Assign.

image

Create a new default configuration for the rules (we can create one later if the developers feel like it’s a good product to use).  click Create and then Click Finish, Visual studio should then start as normal.

From within any application source code you can add a new comment to a function by placing your cursor on the first line.

image

In the above example the cursor is on line 19 for the button1_click.  Hold down <CTRL><SHIFT> and D, or whatever you assigned above.

image

The additional comment information is automatically added.

Why use GhostDoc

So what’s so different about Ghost Doc over the built-in functionality of just typing ‘///’? 

Well, if you provide good variable names it will actually come up with reasonably good comments automatically, for example above it knew “Click” was an Event, which would not happen in the built-in options.

Also you have a whole load of functionality around customising the language used or rules that can be applied.

image

To access the configuration area choose Tools/GhostDoc/Configure GhostDoc.

image

I’m not even going to try and set out the number of options you have here.

If nothing else it’s worth a look.

Monday, February 9, 2009

Getting to grips with LINQ

According to Microsoft LINQ is “a codename for a set of extensions to the .NET Framework that encompass language-integrated query, set, and transform operations. It extends C# and Visual Basic with native language syntax for queries and provides class libraries to take advantage of these capabilities”.  What they actually mean is that its a very interesting way of doing Functional programming using C#.  I make the BIG distinction here between LINQ and LINQ/SQL (i.e. LINQ for SQL databases) as the latter is probably not something that will remain in the Framework long term.  It is probably going to be replaced with the ADO.NET Entity Framework

As an introduction you should download LinqPad which is an excellent tool for the beginner or experience functional programmer.  Not only does it provide a number of samples for a quick start, it also provides a test bed where you can run your queries directly against your data sources.

Installation Instructions

Download to your local machine the LinqPad.exe file from the website.

Double click the LinqPad icon and you should be presented with the application desktop.

image

Testing your queries

The easiest way to test your queries is to do it against a data source, so click the “Add Connection” on the left of the screen.

image

Use the options to connect to your database server and click OK.

Next you select the Database using the “Database” dropdown in the top right and then all you need to do is type your LINQ queries into the work area below. 

Simple where example

   from c in Companies
   where c.Comp_name.Contains("Iona Tech")
   select c

Pressing the play button will execute the query.

image


This example is against a SQL database but that is only for convenience there is no issue at all running queries against array or other collections and that is where the power of this technology can be seen.

Example of Parsing strings

    from word in "The quick brown fox jumps over the lazy dog".Split()
    orderby word.Length
    select word

Example working with arrays

    from n in new[] { 5, 4, 1, 3, 9, 8, 6, 7, 2, 0 }
    where n < 5
   select n

   - or simply -  

    (new[] {5, 4, 1, 3, 9, 8, 6, 7, 2, 0 } ).Where (n => n < 5)

LINQ has a future for the .Net Framework, you only need to look at the developments with PLINQ and the Entity Framework to know that the syntax will start to move into day-to-day C# code.  Also I’d recommend having a review of the F# Development Centre, this is an extension for Visual Studio for developers who really, really, really like their functional programming.

Interesting examples

Here are some links to resources which will come in useful.

Thursday, February 5, 2009

PowerShell for hard core scripting

Microsoft have (finally) released a new scripting language for XP, Vista and its server Products called PowerShell.  This is a vast improvement on the bad old days of writing everything in DOS.  It will be installed by default in Windows 2008, however for earlier OS products you can get it from the Microsoft Site.

Installation

Here are the instructions for getting a copy.  Download and run the EXE from the Microsoft site and follow the online prompts.  Just choose the defaults for all the settings and agree the Licence Agreement.

image

This will add a new item to your Start menu, selecting the Windows Power Shell item will bring you into the PowerShell environment, which is much the same as the standard Command (CMD.EXE) window except you had access to a whole set of new functions and facilities.

image

Creating a basic Power Shell Script

You can create a Powershell script using notepad, Visual Studio or any text editor, however this is a little limited.  I’d recommend the free Power Shell GUI application which can be downloaded and installed.  This gives you IntelliSense some debugging facilities.  Just download and install selecting all the standard default.

image

When you start PowerGUI you get this friendly and basically useless console window.  Just ignore this until you get to the stage of wanting to add your own scripts to the tree.  Your main editor is available from the Tools/PowerGUI Script Editor option on the menu.

image

From here on you can just type your PowerShell scripts and and press the Play button to see it in action.

Power Shell Script Resources

There are numerous examples of good PowerShell scripts on the Internet here are a few I use:

Wednesday, February 4, 2009

Ajax ASP.NET Controls

A developer pointed me at an excellent set of .Net Ajax Controls which are available on CodePlex . Now all I need to do is find an excuse to use it.

Ever get sick of the waning messages from IE?

This message is very annoying on the servers when you just want to download some software.

image

Here are the instructions for removing it.

image

Go to Control Panel/Add Remove Programs and select Windows Components.  When the dialogue appears find the “Internet Explorer Enhanced Security Configuration” entry and uncheck the box and click Next.

image

Once this is completed you should click Finish.

The message should now not be displayed every time you attempt to access a website.

Monday, February 2, 2009

Visual Studio 2008 - Code Snippits

Well I'm back in Ireland and running amok again. Decided to note some old information as I'd forgotten most of these steps since the last time I'd used Visual Studio 2008 Code Snippits.

Creating a Code snippit is very easy as it's just an XML file using a spcific schema. Unfortunetly that schema is a little hard to remember, which is why I'm posting this information in the first place. Below is a simple example which should be saved as an XML file with the extension ".snippit" (e.g. "test.snippit"):

<?xml version="1.0" encoding="utf-8"?>
<CodeSnippets xmlns="http://schemas.microsoft.com/VisualStudio/2005/CodeSnippet">
<CodeSnippet Format="1.0.0">
<Header>
<Title>Test Snippit</Title>
<Shortcut>snipTest</Shortcut>
<Author>Richard Greene</Author>
<Description>Test Code</Description>
</Header>
<Snippet>
<Declarations>
<Literal Editable="true">
<ID>snipTest</ID>
<ToolTip>Add a hello world message</ToolTip>
<Default>Test</Default>
</Literal>
</Declarations>
<Code Language="CSharp">
<![CDATA[MessageBox.Show("Hello World");]]>
</Code>
</Snippet>
</CodeSnippet>
</CodeSnippets>

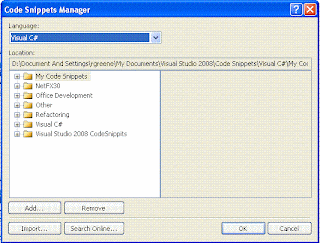
To place this into your Visual Studio 2008 environment, you use the Code Snippit Manager from the Tools menu or the quick keys <CTRL>K <CTRL>B.


Click the Import button and browse to the the location you saved the XML file.

Select the location within the Manager where you want the snippit to appear, I've chosen the standard "My Code Snippets" folder and click Finish.


You should now be able to see the chosen snippet within the Manager.

To make use of this snippit simply within type the shortcut name (in this case "snipTest") within any C# file and Intelisence should display your snippet. Clicking TAB after selecting the snippet will insert the code block you are looking for.

This feature can be expanded greatly, with lots of flexibility for making areas read-only inserting default values etc., however I'll leave that up to you.