Showing posts with label General. Show all posts

Monday, April 28, 2014

Configuring Business Objects Explorer for SSO

I had a few issues with configuring a Business Objects Server this morning for integration with Single-Sign-On.  For some reason the changes I made in the configurations just did not seem to work correctly then looking up the details.

After a few iterations I came up with the follow and figured it would be good to keep them in case I ever needed them again.

1) Edit the ssp.properties file in the folder “<Program files>\SAP BusinessObjects\Tomcat6\webapps\explorer\WEB-INF\classes\”

image

Uncomment the “sso.vintela” and set the other values to match the environment.

Further down the list make these changes too.

image

and further down again change these.

image

2) Restart the server…..

Thursday, January 30, 2014

CHM file is blank when opened

Today I was downloading some API documentation which was in CHM format.  The problem is the files where blank when I opened them!

image

The solution was simple…. Just right click on the file in windows Explorer and click the “Unblock” button on the General tab.

image

Now when you open the file the document information is shown.

image

Wednesday, August 28, 2013

How to refresh the Universe in a Business Objects report

Right click on the universe name in the data panel and select "Change Source"

Select the second option "Specify a new data source" and select "Universe" from the dropdown

Then select the universe name and click "Select"

Then click "Next"

Then check the columns and click "Finish"

Friday, April 19, 2013

Installation of Business Objects Client V4

  1. Run setup .exe
  2. Select English
  3. All Prerequisites should succeed

  1. Click/Next/Next and accept the license/Next/Next
  2. Select the installation directory and click Next

  1. Keep the standard installation options and click Next/Next

  1. After successful installation Click finish.
  2. Reboot your PC.
  3. Information Design tool should be in the Start/SAP BusinessObjects BI platform 4/ folder.

Tuesday, April 16, 2013

Setup Business Objects Explorer for SSO

Logon to the server using RDP
1. Stop Tomcat.
2. Modify the file D:\Program Files (x86)\SAP BusinessObjects\Tomcat6\webapps\explorer\WEB-INF\classes\sso.properties as shown below.

3. Modify the file D:\Program Files (x86)\SAP BusinessObjects\Tomcat6\webapps\explorer\WEB-INF\web.xml as shown below.
image

4. Start Tomcat.
5. Restart the 4 Explorer Servers in Central Configuration Manager (CCM).

Tuesday, July 26, 2011

Business Objects – the basics

Here is some basic information relating to Business Objects which you may find useful..

Setting Up the Server

  • Go to the installer directory
  • Run the "Setup.exe"
  • Note: you’ll need the product code
  • Take all the default settings.

Web Services Available

When installed Business Objects provides 2 main services over the web.
  1. InfoView (:6405/InfoViewApp/logon.jsp">http://<server>:6405/InfoViewApp/logon.jsp); this is the main interface for Users within the Organisation
  2. Central Management Console (:6405/CmcApp/logon.faces">http://<server>:6405/CmcApp/logon.faces) ; this is the administration and control interface for Power Users and Support staff.

Creating and Managing Users

Access the Central Management Console (:6405/CmcApp/logon.faces">http://<server>:6405/CmcApp/logon.faces and click on the User/Group Tab or select "Users and Groups" from the option drop down at the top of the page.

You can create a new User or Group by clicking on the "User List" node and selecting the "New User" icon or "New Group" icon on the menu.

Equally you can edit User/Group details by clicking on the name on the right of the screen.

After you have modified the details you should click "Save" on the bottom right of the screen.

Wednesday, December 15, 2010

BOMGR 0220 errors on Business Objects server

The lads in SKSWood Brunei change the service account running Business Objects this week and it cause the server to bring up BOMGR 0220 errors. Below is the solution…

Steps for solution:

1. Stop the WebI service.

2. Log into the Business Objects Configuration Tool. Start\Programs\Business Objects\Configuration Tool 6.5

3. On the Cluster Manager Page. Go to the Service Parameters branch. At the bottom of the screen there is a drop down - select 'Update Service Parameters'. Edit the username and password. Hit next or finish

4. Refresh the ORB. On the Cluster Manager Page. Select ORB. Select 'Define ORB' from the drop down. Then hit the 'Test Ports' button. Once done, hit next.

5. Hit finish. and close the configuration tool.

6. You change the settings for the Distributed COM Configuration Properties by doing the following:

6.1 Start\Run\type 'dcomcnfg'

6.2 In the Applications Tab, you should see at least BusinessObjects.document

6.3 Click on BusinessObjects.document and select 'Default Security' tab. Ensure that Edit Default for Access Permissions and Launch Permissions includes Interactive, System and the service account you are using.

6.4 Go back to the Applications Tab, select BusinessObjects.document and hit properties.

6.5 Select the Identity Tab. Select 'This User'.

6.6 Type in the new account and password.

6.7 Once you have changed the settings there may be a need to reboot your server.

Friday, November 19, 2010

Setting up Email reporting using Business Objects

Today I had to configure Business Objects to send reports via email. Here are the steps needed to complete the task.

Configuring the server
  1. Logon to the Central Management Console as an Administrator

  1. From the drop down list select "Servers" and on the left select "Servers List"

  1. The server that runs the reports is called the "<servername>.AdaptiveJobServer" double click this to bring up the configuration settings and select Destination from the options on the left.
  2. From the Destination Drop down select "Email" from the list and click "Add".

  1. Enter the following details and then click "Save & Close"

    1. Domain Name: POG
    2. Host: <whatever>
    3. Port:25
    4. Authentication: None
    5. Click "Deliver Document(s) as Attachments
    6. Click "Use automatically Generated Name"
Scheduling a Report to be sent via email
  1. From the Central Management Console select Folders
  1. Using the folder list navigate down the folder list until you find the report you wish to schedule. When you find the report, double click and select "Schedule" from the left hand menu. This menu allows you to set up all the options you need, e.g. running hourly, weekly, who gets the email, output format etc.
  2. Click "Schedule"
  3. On the History List you will be able to see if the report was successfully generated and sent.

Tuesday, December 8, 2009

Conditional Pre-Complication is good for what ails you.

Recently found a comments in the code base that stated "Remove on Live!" in the description.  It was perfectly valid code, but unfortunately but there was no way any developer (other than the person who wrote it in the first place) will remove the code before compiling.  The good news is that there is a solution to this problem and that’s "Conditional Pre-Compilation Symbols".  That all sounds very complicated but its really simple.  It means you can mark a section of code, so that it is placed within a specific assembly.

Simple Conditional Pre-Complication

Here is an example of a function that will appear in all environments and assemblies.

//***********************************
// Test code; remove when running on live.
//***********************************
  if (X==Y || Z==A)

{  
      int AnotherX = Convert.ToInt32(X)|
      _log.DebugFormat("AnoterX has been set to {0}", X);
  }

Pleacing this within a Conditional Pre-Compilation Symbols would look like this:

#if(DEBUG)

   //***********************************
   // Test code; remove when running on live.
   //***********************************
   if (X==Y || Z==A
   {  

      int AnotherX = Convert.ToInt32(X)|
      _log.DebugFormat("AnoterX has been set to {0}", X);
    }

#endif

This means that the code still works fine on you're local PC and Miranda, but now that we're using CC.NET to do a "Release" build, this code will not be included in the assembly.

Doing something more funky

You're not limited to just removing code, you can also directly change the code as shown below:

#if(DEBUG)

      _log.DebugFormat("This is Debug Code");

#else

      _log.DebugFormat("This is Release Code");

#endif

You are also not limited to only using the pre-configured "DEBUG" or "RELEASE" variables, you can also set your own.  To do this, open the property page for your project and select the Build tab.  Here you can see a field called "Conditional compilation symbols".  Here you can enter a value like "Design", but you should also note the Configuration currently selected as this is important. 

image

Now in your code you can do this….

  #if(Design)

      _log.DebugFormat("This is only run when Design is entered in the properties");

  #endif

You can of course add as many build configurations as you wish, e.g. “Debug”, “Test”, “Stage”, “Live” etc. and CC.NET will happy ensure that each is built in turn correctly.

Friday, November 13, 2009

PSTools .. it’s great to find a good tool for once!

I was looking for a way to run scripts on a remote server and found this great set of tools that are freely available from Microsoft.

PSTools; this is basically a set of tools that let you manage a remote server as if it was a local one.  this contains a number of different commands which are all listed on the website.  I’m going to integrate the PSExec command into the project Build Scripts.

Friday, August 14, 2009

New version of Google Search Engine

In case anyone missed this news, Google are releasing a new version of their search engine to the public http://www2.sandbox.google.com/.  I did not see any real difference with the existing one but maybe you will.

Apparently: “For the last several months, a large team of Googlers has been working on a secret project: a next-generation architecture for Google’s web search. It’s the first step in a process that will let us push the envelope on size, indexing speed, accuracy, comprehensiveness and other dimensions. The new infrastructure sits “under the hood” of Google’s search engine, which means that most users won’t notice a difference in search results. But web developers and power searchers might notice a few differences, so we’re opening up a web developer preview to collect feedback.”

http://googlewebmastercentral.blogspot.com/2009/08/help-test-some-next-generation.html

Saturday, June 6, 2009

Set of very interesting Webcasts

I was doing some surfing over the weekend and came across an very interesting site called Dime Casts.  It’s a selection of tutorials that don’t take longer than 10 minutes.

Some of the topics covered are very interesting in terms of good .Net programming techniques for using Design Patterns.  Check it out if you have a few minutes.

Saturday, March 28, 2009

Blogging via Windows Live Writer

Its important to let everyone know what your doing, so here is an easy way to interact with a blog. I’d encourage everyone to post once or twice a week anything they’ve learned; be it technical or organisational, important or trivial. Once it has been entered into the blog others will benefit from that knowledge and we’ll forever have a record.

This is software is also ideal for documenting systems and procedures “as-you-go”, as all you need to do is take screen shots and paste them directly into your documentation.

To start I’ll show you how to download and use Microsoft Windows Live Writer and connect it to a SharePoint Blog.

Getting Live Writer

The software is freely available from the Microsoft Website, simply click the Download button, Click Run and Run again when prompted.

lr1

Uncheck everything except “Writer” and click Install.
lr2

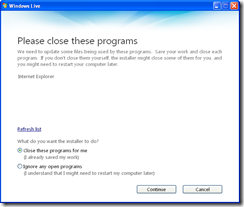
You’ll be asked to close Internet Explorer, do this and click Continue.

lr3

You’ll see the Progress bar during the installation.

lr4

Deselect everything from the additional installation window as you don’t need it and click Continue.

lr5

Finally click close and you should be ready to start using the software.

Starting Live Writer and connecting to the IT Blog.

Once installed you should get a new item in your Start/Programs/Windows Live menu called Windows LiveWriter. It should open first time only asking you to connect to a default Blogging site.

image

Click Add..

image

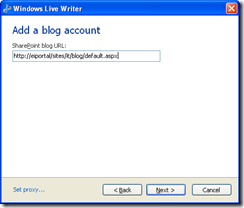
Select SharePoint Blog and click Next.
image

In the Blog URL you need to type the following: /sites/it/blog/default.aspx, then">http://<server>/sites/it/blog/default.aspx, then click Next.
image

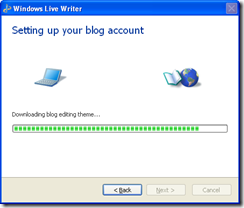
You should see a progress window as Live Writer searches for the Blog details.

image

If successful you will be asked for a Blog Name, I’d recommend choosing the same name as the blog, as you can add additional blogs to the application if needed.
image

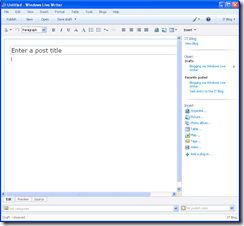
You should now be able to access the Blog each time the application starts. If this is your only blog, it will open be default, however if you want to use multiple blogs be sure to check the upper right of the screen which should say “Blog”.

Publishing a post

Live writer is much like Word simply type in the work space and cut/paste images and screen shots. When you are finished click the Publish button in the upper left hand corner of the tool bar.

image

You should see the progress bar and finally a new Browser window will open and you can see your blog entry.

Wednesday, February 4, 2009

Ever get sick of the waning messages from IE?

This message is very annoying on the servers when you just want to download some software.

image

Here are the instructions for removing it.

image

Go to Control Panel/Add Remove Programs and select Windows Components.  When the dialogue appears find the “Internet Explorer Enhanced Security Configuration” entry and uncheck the box and click Next.

image

Once this is completed you should click Finish.

The message should now not be displayed every time you attempt to access a website.