I’m really looking forward to giving a presentation on Smart Contracts to a Perth Meetup Group on the 8th of April. I’ve put together instructions on how to setup your environment on GitHub.
Thursday, March 30, 2017
Thursday, January 12, 2017
Some more Ruby
Trying out Ruby code again today for no specific reason other than to try out some different languages. Expanding on the previous example I decided to allow edge detection for multi-row matrix. This time we look for changes to the matrix with the left character and the row above.
Some comments on the syntax
- I found the for loop syntax a little weird “…” does not seem very intuitive.
- Reading from standard Input was really simple and felt good.
- Some of the syntax like ‘gsub’, ‘def’ (instead of 'function') would take a little getting used too, but Stack Overflow was a big help with that.
- RegEx was never my favourite technology, but Rubular website was very good; however did not work on Safari only Chrome.
- Closing ‘if' statements with ‘end’ felt like I was coding basic again.
Full code example is below.- Reading from standard Input was really simple and felt good.
- Some of the syntax like ‘gsub’, ‘def’ (instead of 'function') would take a little getting used too, but Stack Overflow was a big help with that.
- RegEx was never my favourite technology, but Rubular website was very good; however did not work on Safari only Chrome.
- Closing ‘if' statements with ‘end’ felt like I was coding basic again.
#!/usr/bin/env ruby
# Usage: cat <filename> | ./<edge.rb>
# Usage: cat <filename> | ./<edge.rb>
def CalculateEdge(arr)
result = "" # loop over each line of the array of text items
for lineIndex in 0 ... arr.size
topChar = "0" # start empty
prevChar = "0" # start empty
for charIndex in 0 ... arr[lineIndex].chomp.size
# consider <whitespace> as '0'
currentChar = arr[lineIndex][charIndex].gsub(/\s/,'0')
# validation checks
if lineIndex == 0 then
topChar = currentChar # assume current char if first row
elsif lineIndex > 0 && charIndex > arr[lineIndex-1].chomp.size
topChar = "0" # assume "0" if missing on row above
else
topChar = arr[lineIndex-1][charIndex].nil? ? "0" : arr[lineIndex-1][charIndex].gsub(/\s/,'0')
end
# XOR char against the previous char to the left of current
edgeLeft = prevChar.to_i(2) ^ currentChar.to_i(2)
# XOR char against the char above the current
edgeTop = currentChar.to_i(2) ^ topChar.to_i(2)
# if the left char has not changed use the top row
edge = edgeLeft == 1 ? edgeLeft : edgeTop
prevChar = currentChar
result = result+"#{edge}"
end result = "#{result}\n\t"
end
return result
end
# Place each line into an array
input = $stdin.read
if not (input =~ /[^0-1\W]/).nil? then
puts "Error: Only 0-1 values allowed. e.g. 0100001111"
puts " Whitespace will be considered '0'"
exit
end
arr = input.split(/\n/)
result = CalculateEdge(arr)
puts "Input :\t#{input}"
puts "Output:\t#{result}"
input = $stdin.read
if not (input =~ /[^0-1\W]/).nil? then
puts "Error: Only 0-1 values allowed. e.g. 0100001111"
puts " Whitespace will be considered '0'"
exit
end
arr = input.split(/\n/)
result = CalculateEdge(arr)
puts "Input :\t#{input}"
puts "Output:\t#{result}"
Next steps for the language
Must see if you can Unit Test this language ….. debugging on the command line was not great.Tuesday, January 10, 2017
Going with Ruby
Today I decided to try some different languages just to see what would happen. I decided to try Ruby, just because it was on my laptop. Created by Yukihiro "Matz” Matsumoto around 1995, Ruby is one of those dynamic languages, primevally used on the Web. I have found out however that it’s also quite general so can be used as an alternative for Bash.
I took a simple edge case computation to try out. This is where a string of binary numbers is suppled and the program notes when the pattern changes. It’s a fairly simple problem, but nice as it hits all the main pain points, input for users, validation, loops, output of results, etc.
I’m happy to say it was a really simple language to understand. The “IRB” (Interactive RuBy) command within Terminal, lets you try out code on the fly. Getting the script to run on the Mac required a change to permissions to give it execute rights (“chmod 777”), but that’s was acceptable.
#!/usr/bin/env ruby
# Edge detection script
input = gets.chomp
if not (input =~ /[^0-1]/).nil? then
puts "Error: Only 0-1 values allowed. e.g. 0100001111"
exit
end
prevChar = "0"
result = ""
begin
input.split("").each do |currentChar|
# XOR each char against the previous
edge = (prevChar.to_i(2) ^ currentChar.to_i(2)).to_s(2)
result = result+"#{edge}"
prevChar = currentChar
end
puts "Input : #{input}"
puts "Output: #{result}"
rescue Exception => e
puts 'There was an unexpected error processing. ' + e.messageend
end
All in all, it’s a nice language
Thursday, June 23, 2016
Running .Net on a Mac
Since the delivery of .NET Core is close, I figured it was time to give it a try on my Mac.
1) Installed Visual Studio Code
2) Installed .Net Core
3) Create a project directory
Open Terminal and go to your working directory
‘mkdir HelloWorld'
‘cd HelloWorld’
4) Get yourself the default template; lucky for us dotnet gives us a simple option.
‘dotnet new’
This command will give you two files; “Program.cs” and “project.json” in the project directory.
5) Build the default project
‘dotnet build’
This will return two error messages shown below because we’re missing some basic dependencies.
"Project HelloWorld does not have a lock file.
Project HelloWorld does not have a lock file.”
6) Get your dependancies where are noted in project.js
‘dotnet restore’
If you’ve never attempted this before your system will head off to the Internet and download everything you need. If you’re done this at any stage before nuget should just get them from the cache.
7) Try your build again and it should succeed
‘dotnet build'
 8) Run your simple default application
‘dotnet run'
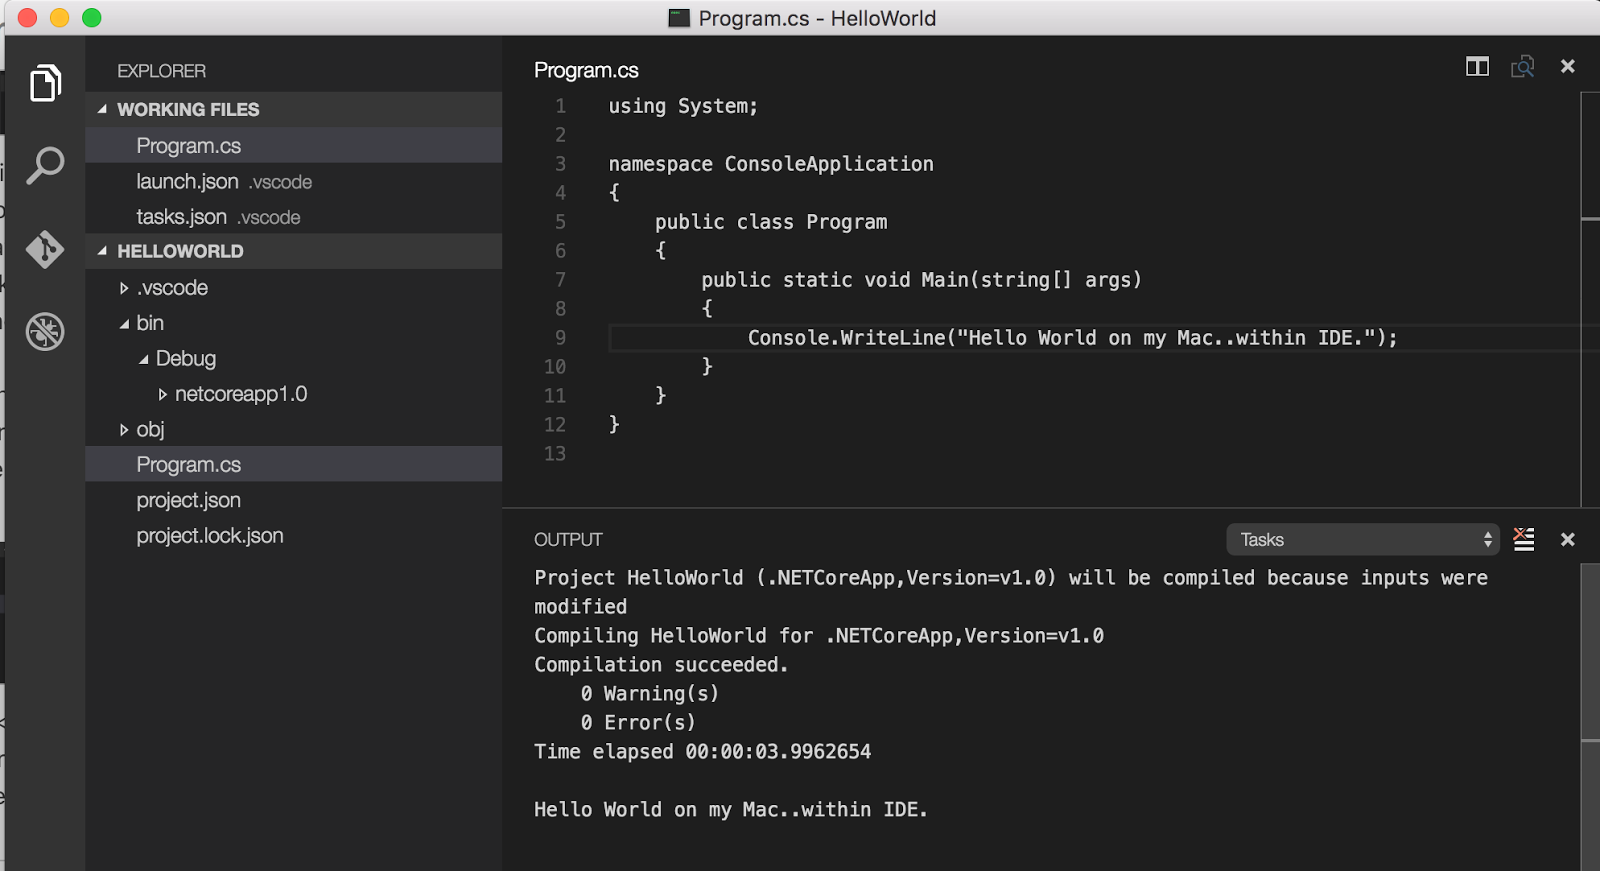
 9) Open the program in Visual Studio Code and make a simple change to the code on line 9 to return some specific text. Save the file and run again.
 10) Run your updated application
‘dotnet run'
 The framework identified that the code has changed and rebuilt the application.
1) Click the debug icon in VSC and then then Play icon in the toolbar.
 This will ask you to select the environment you want to run. I picked “VS Code Extension Development”, but really we’re just looking for it to create the launch.json file.
2) Click Close and then hit Play button again and “Configure Task Running” which gives you a list of different options to choose from. I picked “.Net Core"
3) At this point you should end up with a new "tasks.json” file within your project.
4) Open this and change the “taskName” from “build” to “run” and save.
 5) Hit <shift><command>P; to bring up the explorer option in the toolbar
6) type ‘run’ and select “Tasks: Run Task” and within the output window you should see the results.
 7) But seriously, who wants to type all that every time.. I prefer to stick to my old Visual Studio <shift><command>B. So we need to reassign that using Code/Preferences/Keyboard Short cuts from the menu.
8) This will create a new keybindings.json file where you can override existing or add new bindings. I added the following and saved the file:
[{
"key": "shift+cmd+b",
"command": "workbench.action.tasks.runTask",
"when": "editorTextFocus"
}
]
9) Now all I need to compile/run is hit the short cut keys.
1) Installed Visual Studio Code
2) Installed .Net Core
3) Create a project directory
Open Terminal and go to your working directory
‘mkdir HelloWorld'
‘cd HelloWorld’
4) Get yourself the default template; lucky for us dotnet gives us a simple option.
‘dotnet new’
This command will give you two files; “Program.cs” and “project.json” in the project directory.
5) Build the default project
‘dotnet build’
This will return two error messages shown below because we’re missing some basic dependencies.
"Project HelloWorld does not have a lock file.
Project HelloWorld does not have a lock file.”
6) Get your dependancies where are noted in project.js
‘dotnet restore’
If you’ve never attempted this before your system will head off to the Internet and download everything you need. If you’re done this at any stage before nuget should just get them from the cache.
7) Try your build again and it should succeed
‘dotnet build'
‘dotnet run'
‘dotnet run'
Building and running with Visual Studio Code
Having to run on the commend line is a bit of a pain, so this is how you can do it within the Visual Studio Code IDE (VSC).1) Click the debug icon in VSC and then then Play icon in the toolbar.
2) Click Close and then hit Play button again and “Configure Task Running” which gives you a list of different options to choose from. I picked “.Net Core"
3) At this point you should end up with a new "tasks.json” file within your project.
4) Open this and change the “taskName” from “build” to “run” and save.
6) type ‘run’ and select “Tasks: Run Task” and within the output window you should see the results.
8) This will create a new keybindings.json file where you can override existing or add new bindings. I added the following and saved the file:
[{
"key": "shift+cmd+b",
"command": "workbench.action.tasks.runTask",
"when": "editorTextFocus"
}
]
9) Now all I need to compile/run is hit the short cut keys.
Sunday, June 12, 2016
Install TP-Link TL-WN822N on Mac
Playing with a high-gain antenna today on my Mac and had issues getting it to be recognised by the operating system. I’m running OSx El Capitan (v 10.11.5) and just plugging in the devices although working on my Windows Laptop refused to be see on the Mac.
To get everything up and running I needed to do a bit of Googling which lead me to this port, which had very little real detail so here are the steps I took.
1) Download the driver from the TP Link site (http://www.tp-link.com/en/download/TL-WN822N.html#Driver or go directly to the download (http://www.tp-link.com/res/down/soft/TL-WN822N(EU)_V4_160315_Mac.zip).
2) Once you download the file, you should find another file "Mac OS X 10.7_10.10.zip”. Open this file and you get an installer and Uninstall.command file.
3) Download Pacifist and follow the instructions for the installation. Watch out for any of the attpemts to get you to sign up for things that you really don’t want. Once the application starts open the installer.pkg file
4) Select the "RtWlanU1827.kext” file and click
“Install” from the upper left hand corner of the dialogue.
5) Drag the "TP-LINK Wireless Configuration Utility” application to your
desktop.
6) Double click the "TP-LINK Wireless Configuration Utility” application
and the antenna details should appear.
Entity Framework error ‘There is already an open DataReader associated with this Command which must be closed first.’
Had an error on a WebAPI call, which suddendly appeared, when attempting to get a list of Users from standard Identity Framework code.
There was the ususal massive (and almost completely useless) outer exception of "Error getting value from 'Claims' on 'System.Data.Entity.DynamicProxies.ApplicationUser_7215CB73076794A910D6058DEA10BE4541B79EFD3A2E64C8BB0403E9276DE20E'.” and within that "An error occurred while executing the command definition. See the inner exception for details”. Until finally we got to the base error "There is already an open DataReader associated with this Command which must be closed first.” of type System.InvalidOperationException.
After a few minutes scrating my head trying to figure out what was wrong, changing connection strings and trying to shut down all connections I came across a new option that can be added to the connection string, which was "MultipleActiveResultSets=True” (https://msdn.microsoft.com/en-ie/data/jj556606.aspx).
Changing the string from:
Server=(LocalDb)\MSSQLLocalDB;Database=<name>;Trusted_Connection=True
to
Server=(LocalDb)\MSSQLLocalDB;Database=<name>;Trusted_Connection=True;MultipleActiveResultSets=True;
Addressed the issue; I’m not 100% on the impact of this change, but it seems to fix the error and have no obvious down side.
Monday, July 28, 2014
Is your Business Objects Server running at CPU 99% load?
Today the Business Object server was running like a dog,
checking the performance showed that the server was eating up 99% CPU at all
times. The problem turned out to be
related to the Index Service running continually rather than on a scheduled
basis.
Steps to address the where:
1. Login to CMC
2. Click on Application, Right click Platform Search
Application>Properties
3. In Crawling frequency, select #Scheduled crawling#
4. In Level of indexing, select #Platform and Document
Metadata#. (Optional, platform search application will index faster)
5. In Content Types, uncheck #Universe#. (Optional, platform
search application will index faster)
6. In Error Recovery, check #Rebuild index#
7. Save and Close
8. Go to Folder>Platform Search Scheduling, schedule the
Platform Search Scheduling object to be done when times when there is a lower
usage of the resources
Subscribe to:
Posts (Atom)