I've been trying out some OpenGL code on the iPhone which is way out of my comfort zone. It's the first time i've posted anything using MonoTouch also, but with any luck if I can continue to work in this area it may lead to some new innovations. My first project in this area would be to create a 3D cube and rotate it. Sounds simple, but finding posting and same code using MonoTouch turn out to be impossible. "How hard can it be?" I said to myself, well .. lets see....
Creating the project
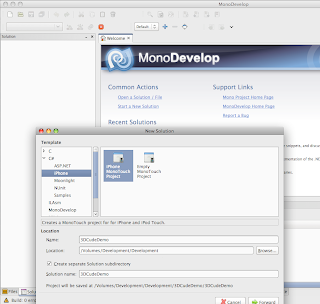
MonoTouch and MonoDevelop makes this very easy indeed, just start the IDE and select File/New/Solution, select iPhone/iPhone MonoTouch Project and give it the name 3DCubeDemo.
Click Forward and then OK.
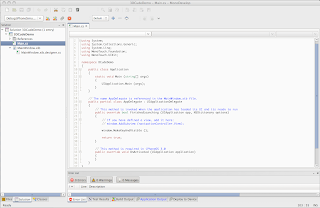
This will give you a standard project structure with a Main.cs file which is the same as the ApplicationDelegate and a MainWindow.xib file which is the InterfaceBuilder file for defining the interface.
Adding our View
First step is to create a view onto which we can apply our 3D Cube. Double Click the MainWindow.xib file which should start Interface Builder.
Drag a new view Control from the "Windows, Views & Bars" section in the Library onto the Window.
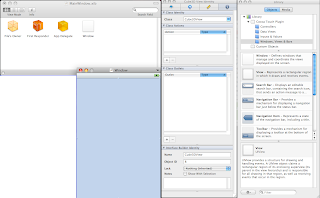
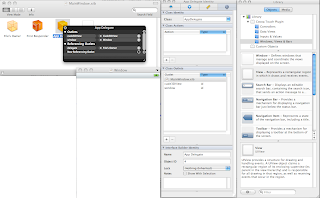
Change the View class field to "Cube3DView" and the Interface Name to Cube3DView.
Select the App Delegate and Create a new outlet called cude3DView. Then connect this to the view by dragging the link to the View called Cube3DView.
Save the file and close InterfaceBuilder.
Doing the code thing...
When you save the file in interface Builder you'll see that it automatically updates your MainWindow.xib.designer.cs file with a partial class called Cube3DView and add a property to the AppDelegate called cube3Dview. This is all fine if we just wanted to use the out of the box UIView methods but in this case we need a bit more access. best thing to do is modify the property so it returns a full Cude3DView class as opposed to the default UIView.
[MonoTouch.Foundation.Connect("cube3DView")]
private MonoTouch.UIKit.UIView cube3DView {
get {
return ((MonoTouch.UIKit.UIView)(this.GetNativeField("cube3DView")));
}
set {
this.SetNativeField("cube3DView", value);
}
}
becomes
[MonoTouch.Foundation.Connect("cube3DView")]
private Cube3DView cube3DView {
get {
return ((Cube3DView)(this.GetNativeField("cube3DView")));
}
set {
this.SetNativeField("cube3DView", value);
}
}
and
// Base type probably should be MonoTouch.UIKit.UIView or subclass
[MonoTouch.Foundation.Register("Cube3DView")]
public partial class Cube3DView {
}
becomes
// Base type probably should be MonoTouch.UIKit.UIView or subclass
[MonoTouch.Foundation.Register("Cube3DView")]
public partial class Cube3DView : MonoTouch.UIKit.UIView {
}
Note: This is a problem for the moment as once you edit the view again in InterfaceBuilder it will overwrite your changes. I'll keep looking out for better solutions using partial classes.
Creating the Model and link to OpenGL.
Create a new class file called Cube3DViewand place the following code into the file. I've bolded some of the more interesting areas;
using System;
using System.Drawing;
using MonoTouch.CoreAnimation;
using MonoTouch.CoreGraphics;
using MonoTouch.Foundation;
using MonoTouch.OpenGLES;
using MonoTouch.UIKit;
using MonoTouch.ObjCRuntime;
using OpenTK.Graphics;
using OpenTK.Graphics.ES11;
using OpenTK.Platform;
using OpenTK.Platform.iPhoneOS;
namespace DCudeDemo
{
public partial class Cube3DView : UIView {
int BackingWidth;
int BackingHeight;
iPhoneOSGraphicsContext Context;
uint ViewRenderBuffer, ViewFrameBuffer;
uint DepthRenderBuffer;
NSTimer AnimationTimer;
internal double AnimationInterval;
const bool UseDepthBuffer = false;
[Export ("layerClass")]
public static Class LayerClass ()
{
return new Class (typeof (CAEAGLLayer));
}
[Export ("initWithCoder:")]
public Cube3DView (NSCoder coder) : base (coder)
{
CAEAGLLayer eaglLayer = (CAEAGLLayer) Layer;
eaglLayer.Opaque = true;
eaglLayer.DrawableProperties = NSDictionary.FromObjectsAndKeys (
new NSObject []{NSNumber.FromBoolean(false), EAGLColorFormat.RGBA8},
new NSObject []{EAGLDrawableProperty.RetainedBacking, EAGLDrawableProperty.ColorFormat}
);
Context = (iPhoneOSGraphicsContext) ((IGraphicsContextInternal) GraphicsContext.CurrentContext).Implementation;
Context.MakeCurrent(null);
AnimationInterval = 1.0 / 60.0;
}
void DrawView ()
{
float[] cube = {
-0.5f, 0.5f, 0.5f, // vertex[0]
0.5f, 0.5f, 0.5f, // vertex[1]
0.5f, -0.5f, 0.5f, // vertex[2]
-0.5f, -0.5f, 0.5f, // vertex[3]
-0.5f, 0.5f, -0.5f, // vertex[4]
0.5f, 0.5f, -0.5f, // vertex[5]
0.5f, -0.5f, -0.5f, // vertex[6]
-0.5f, -0.5f, -0.5f, // vertex[7]
};
byte[] triangles = {
1, 0, 2, // front
3, 2, 0,
6, 4, 5, // back
4, 6, 7,
4, 7, 0, // left
7, 3, 0,
1, 2, 5, //right
2, 6, 5,
0, 1, 5, // top
0, 5, 4,
2, 3, 6, // bottom
3, 7, 6,
};
float[] cubeColors = {
1.0f, 0.0f, 0.0f, 1.0f,
0.0f, 1.0f, 0.0f, 1.0f,
0.0f, 0.0f, 1.0f, 1.0f,
0.0f, 1.0f, 1.0f, 1.0f,
1.0f, 0.0f, 0.0f, 1.0f,
0.0f, 1.0f, 0.0f, 1.0f,
0.0f, 0.0f, 1.0f, 1.0f,
0.0f, 1.0f, 1.0f, 1.0f,
};
Context.MakeCurrent(null);
GL.Oes.BindFramebuffer (All.FramebufferOes, ViewFrameBuffer);
GL.Viewport (0, 0, BackingWidth, BackingHeight);
GL.Enable(All.CullFace);
GL.MatrixMode (All.Projection);
GL.LoadIdentity ();
GL.Ortho (-1.0f, 1.0f, -1.5f, 1.5f, -1.0f, 1.0f);
GL.MatrixMode (All.Modelview);
GL.Rotate (3.0f, 0.0f, 2.0f, 1.0f);
GL.ClearColor (0.5f, 0.5f, 0.5f, 1.0f);
GL.Clear ((uint) All.ColorBufferBit);
GL.VertexPointer(3, All.Float, 0, cube);
GL.EnableClientState (All.VertexArray);
GL.ColorPointer (4, All.Float, 0, cubeColors);
GL.EnableClientState (All.ColorArray);
GL.DrawElements(All.Triangles, 36, All.UnsignedByte, triangles);
GL.Oes.BindRenderbuffer (All.RenderbufferOes, ViewRenderBuffer);
Context.EAGLContext.PresentRenderBuffer ((uint) All.RenderbufferOes);
}
public override void LayoutSubviews ()
{
Context.MakeCurrent(null);
DestroyFrameBuffer ();
CreateFrameBuffer ();
DrawView ();
}
bool CreateFrameBuffer ()
{
GL.Oes.GenFramebuffers (1, ref ViewFrameBuffer);
GL.Oes.GenRenderbuffers (1, ref ViewRenderBuffer);
GL.Oes.BindFramebuffer (All.FramebufferOes, ViewFrameBuffer);
GL.Oes.BindRenderbuffer (All.RenderbufferOes, ViewRenderBuffer);
Context.EAGLContext.RenderBufferStorage ((uint) All.RenderbufferOes, (CAEAGLLayer) Layer);
GL.Oes.FramebufferRenderbuffer (All.FramebufferOes,
All.ColorAttachment0Oes,
All.RenderbufferOes,
ViewRenderBuffer);
GL.Oes.GetRenderbufferParameter (All.RenderbufferOes, All.RenderbufferWidthOes, ref BackingWidth);
GL.Oes.GetRenderbufferParameter (All.RenderbufferOes, All.RenderbufferHeightOes, ref BackingHeight);
if (GL.Oes.CheckFramebufferStatus (All.FramebufferOes) != All.FramebufferCompleteOes) {
Console.Error.WriteLine("failed to make complete framebuffer object {0}",
GL.Oes.CheckFramebufferStatus (All.FramebufferOes));
}
return true;
}
void DestroyFrameBuffer ()
{
GL.Oes.DeleteFramebuffers (1, ref ViewFrameBuffer);
ViewFrameBuffer = 0;
GL.Oes.DeleteRenderbuffers (1, ref ViewRenderBuffer);
ViewRenderBuffer = 0;
if (DepthRenderBuffer != 0) {
GL.Oes.DeleteRenderbuffers (1, ref DepthRenderBuffer);
DepthRenderBuffer = 0;
}
}
public void StartAnimation ()
{
AnimationTimer = NSTimer.CreateRepeatingScheduledTimer (TimeSpan.FromSeconds (AnimationInterval), () => DrawView ());
}
public void StopAnimation ()
{
AnimationTimer = null;
}
public void SetAnimationTimer (NSTimer timer)
{
AnimationTimer.Invalidate ();
AnimationTimer = timer;
}
public void SetAnimationInterval (double interval)
{
AnimationInterval = interval;
if (AnimationTimer != null) {
StopAnimation ();
StartAnimation ();
}
}
}
}
I can't really take all the credit for this script as it's mainly a modification of the 2D sample provided on the MonoTouch site. There were however a number of changes needed to work this into a 3D model. The "cube[]" array of floats contains all the data for the model, these are simple X, Y, Z coordinates positioned from 0,0,0 at the centre. The triangles byte array for geometry, where I get a bit fuzzy on the whole thing, check out the iPhone OpenGL article which I used as a base for my example. The other functions should be self explanatory GL.Rotate, GL.VertexPointer and GL.DrawElements are where all the data comes together.
Once you compile you'll get the error "The type or namespace 'OpenTK' could not be found" error. OpenTK is simply the Mono implementation of the OpenGL infrastructure so all you need to do is add this as a project reference. <Ctrl> Click the References folder in your solution and select "Edit References...".
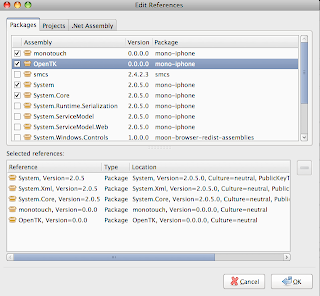
Click the OpenTK reference and click OK.
Finally we need to initialize this new class correctly in the Main.cs file. Open the Main.cs file and add the following using commands at the top of the file.
using OpenTK.Platform;
using MonoTouch.OpenGLES;
Modify the Main entry point to the application so it tells the UIApplication that we will be making use of OpenGL.
static void Main (string[] args)
{
using (var c = Utilities.CreateGraphicsContext(EAGLRenderingAPI.OpenGLES1)) {
UIApplication.Main (args);
}
}
Modify the AppDelegate "FinishedLoading" method so that it initializes the animation;
public override bool FinishedLaunching (UIApplication app, NSDictionary options)
{
// If you have defined a view, add it here:
// window.AddSubview (navigationController.View);
window.MakeKeyAndVisible ();
cube3DView.AnimationInterval = 1.0 / 60.0;
cube3DView.StartAnimation();
return true;
}
Compile and run the application and you should see the following appear in the simulator:
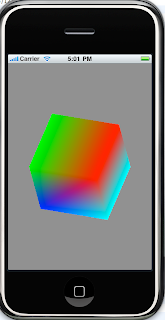
How good is that!?!